Question 1: Draw the projections of the given considering the Reference Line X-Y to be the same. You might keep the distance between the projectors equal to 30 mm.
a) Point ‘A’ 50 mm above H.P. and 60 mm behind V.P.
b) Point ‘B’ 45 mm below H.P. and on V.P.
Question 2: Draw the projection of a line which is 65 mm long and its one end is in HP at a point 15 mm in front of the VP. The other end is in the third quadrant. The line is inclined at 60° to HP and 30° to VP. Draw the projections of line.
Question 3: A pentagonal sheet having all edges equal in length is placed with one edge parallel to HP. The surface of the sheet is inclined at 30° to HP and parallel to VP. If each side of sheet is 50 mm, draw its projections.
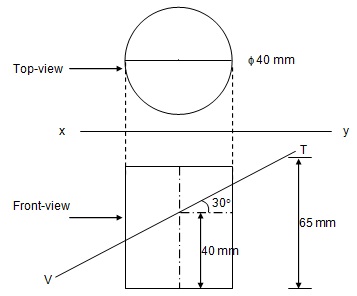
Question 4: Given figure illustrated below shows the top-view and front of a cylinder, cut by a Sections-plane V.T. Show its Sectional-Top-View.
